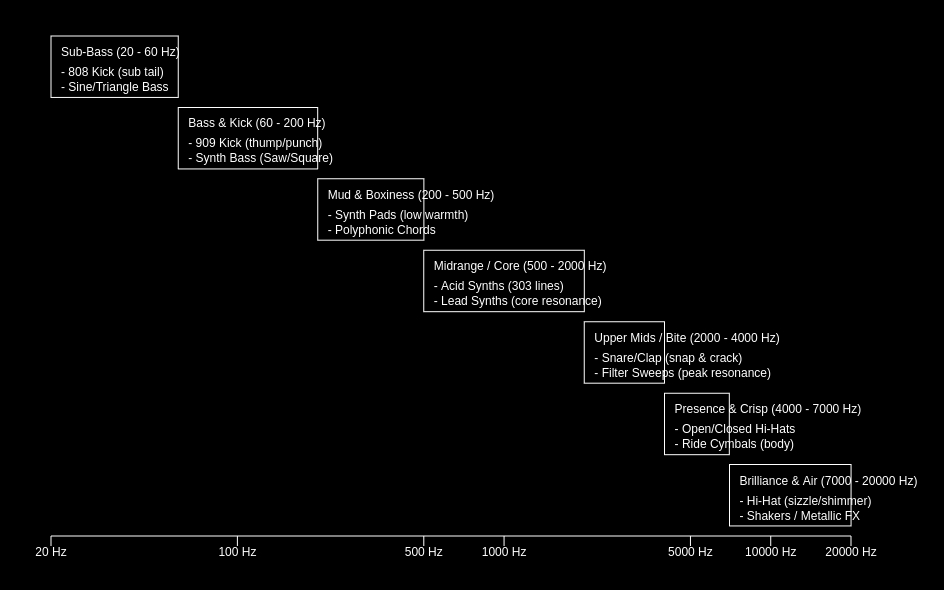
Composing your song, learn to keep a mental note of the different frequencies you are using and targeting.
Make a mental note of any tracks you know may occupy the same frequencies. For example, in some genres, it is common to have a bassline + another "driving" bass (often just repeating the same note rapidly) to add energy or drive. These two elements would obviously compete for the same frequencies, but they have different goals. One is oriented towards conveying a bass hook or melody, while the other is just there to convey energy/urgency/drive/rhythm. Once it is time to perform mastering of your song, you should probably opt to remove/attenuate the driving bass' fundamental (use a high pass EQ or "missing fundamental" technique), retaining the suggestion/rhythm of the driving bass, however leaving the fundamental free for the actual (more important) bassline.
Another example is your lead and some backing chords - perhaps some pads or strings. These tend to occupy the same frequency range. When it comes to mixing, you could, for example consider using side chaining to duck the chords a little whenever the lead is playing. A more crude (though usually effective) method would be to perform a mid/low cut using the parametric EQs around 440Hz. "Crude" because this would affect your chords throughout the entire song, rather than just "sometimes" while the lead is playing.
In general, the effectiveness of side chaining cannot be overstated. The idea is that you don't have to worry about clashing frequencies to begin with, if you can simply make sure that the clash doesn't happen in the first place. That's because one of the potentially competing elements is simply (temporarily) not playing. It is a very effective way of creating clarity in your mix.
For example, to side chain your chord track to your lead so that the chord track "falls away" whenever your lead is playing;
In the same way you can create that familiar "pumping" effect in response to a kick; just send the kick's audio (or some other signal, like its oscillator volumes) to a bus and have anything you'd like to get "pumped" subscribe to that bus. It's a classic way to bring out the kick and making sure it doesn't get lost in your mix.
If you use delays or reverb on your lead and find the effects cause your lead to disappear in "mud" due to the reverb/delay signal competing with the lead itself, then consider engaging the pre-FX high pass filter (7/hh/Ef.HP on the Pan+EQ/PnEQ page of a track). This way any reverb or delay will not compete with the lead, but will still provide the suggestion of space, delay and reverb (just in the higher frequencies - clear of the frequencies the lead occupies).
If you don't want to use pre-filtering of the effects send, you can alternatively have a track duck its own send effects level by using the 14/A6/rv.dU/Reverb Ducking or 15/A7/dL.dU/Delay Ducking setting on the dyna page of a track. This can also be used for creative effects where slowly decaying instrument tail gradually washes out as it decays in volume.
If you find elements are getting lost due to some other element's use of FX, use the global effects ducking setting (13/A5/Gb.du/Global Ducking on a track's dyna page). This temporarily make the FX less audible while your element is playing. This technique can be quite useful for bringing a lead to the fore.
Ducking uses a track's compressor attack (11/A3/Cm.At) and release (11/A3/Cm.rL) settings for its audio envelope follower.
If you genre calls for a strong sub-bass, be aware that not all sound reproducing devices can replicate such low frequencies. In such cases, you must decide whether you are happy to not have a sub-bass at all on such devices (for example as seen in old school dub step), or whether you would like to at least provide a "hint" of something happening.
Stereo widening makes a mix feel bigger by increasing the difference between the left and right channels, which spreads sounds outward and creates a wider sense of space. Bass monofying does the opposite for low frequencies: it forces the bass into mono so both speakers reproduce the same low-end signal, keeping kicks and basslines tight, centered, and phase-safe. Together, these techniques help mixes feel wide and immersive on top, while keeping the low end solid, punchy, and reliable across speakers, headphones, clubs, and vinyl systems.
On the Song's 'MStr' (mastering) page, use 1/Cd/WidE 'Stereo Widening' set the high frequency stereo width to a percentage (0-400) of the input signal. Use 2/bs/Mono 'Bass Monofy' to select a frequency below which audio content is pulled towards the center of the stereo field.
Slap delay and ADT-style (Artificial Double Tracking) widening can be achieved per-track by configuring one of the delays with a very short delay time. For your convenience, this is the default setup for Delay 2 when a song is initialized.
It useful for increasing presence of drums (such as snares and kicks) as well as making other parts sound fuller or "in your face". If panning is "left and right", this technique can turn one of the delay sends into "back and front". See also the delay documentation in the sound design section for more details on this technique.